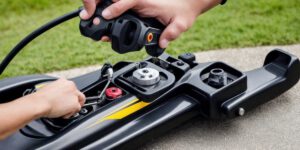
Bleeding kart brakes can be a challenging task, but with the right tools and techniques, it can be done quickly and efficiently. In this article, we provide a step-by-step guide on how to bleed your kart brakes effectively. Before starting, make sure you have all necessary tools and equipment, including a bleeder kit, brake fluid, wrench set, filter wrench, tubing, clamps, a clean workspace, gloves, and eye protection.
The first step is to drain the old brake fluid from the reservoir, followed by preparing the bleeder kit by connecting the tubing to the bleeder and attaching the clamps to the brake lines. Then, slowly pour the new brake fluid into the reservoir while pushing the air out of the system to avoid bubbles or air pockets. After bleeding, check for leaks in the brake lines and reservoir.
It’s recommended to bleed your kart brakes every 2-3 months or whenever you notice a significant drop in performance. Bleeding your own brakes is possible but can be time-consuming and potentially dangerous if not done correctly. Signs that your kart brakes may need to be bled include a soft or spongy brake pedal, longer stopping distance, and strange noises coming from the brake system. By following these steps and taking precautions, you can ensure that your kart brakes are always in top condition and ready for action.